Adding Your Website to Bing Webmaster Tools: Tutorial

Bing is one of the world’s most prominent search engines. Submitting your site to its webmaster tool allows you to track its performance and keyword ranks, as well as resolve indexing concerns.
In this article, you will learn, how to add your websites to Bing Webmaster Tools.
What exactly is Bing Webmaster Tools?
Microsoft’s Bing Webmaster Tools is a free service that allows you to add your website to the Bing search engine results.
This free tool improves your WordPress SEO by optimising your site for Bing, allowing you to receive more traffic.
The webmaster tools allow you to monitor and measure the performance of your site in Bing. You may discover which keywords people use to locate your website, allowing you to optimize those search terms in your content and increase traffic.
Additionally, you can watch how Bing crawls and indexes your material. This aids in identifying and resolving indexing issues that may prevent a blog post from showing in Bing search results.
Other than that, Bing Webmaster Tools displays your site’s backlinks as well as the websites to which you are connecting. It also assists in removing information that you do not want to see in Bing search results and scanning for potential malware or spam concerns that might jeopardize the security of your WordPress website.
Let’s look at how to add a website to Bing Webmaster Tools utilising the All in One SEO Tool (AIOSEO).
Adding your website with Bing Webmaster Tools, making Use of AIOSEO
Using All in One SEO is the easiest and best technique to add a website to Bing Webmaster Tools (AIOSEO).
It is the greatest SEO plugin for WordPress that allows you to optimise your site for search engines without the need for technical expertise or hiring an expert.
For this lesson, we’ll utilise the AIOSEO Lite edition because it’s free and contains the ‘Webmaster Tools Verification’ feature. There is also an AIOSEO Pro edition with additional capabilities such as link helper, redirections, video sitemaps, and more.
Now, The AIOSEO plugin must then be installed and activated.
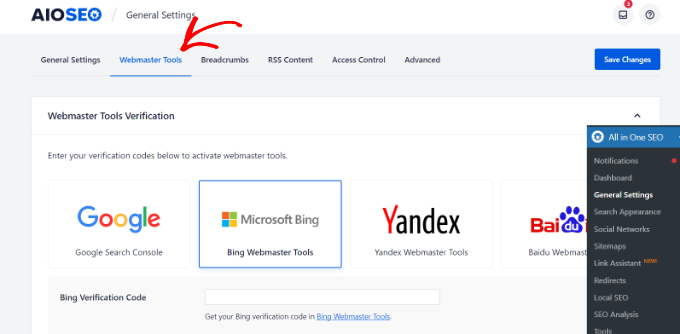
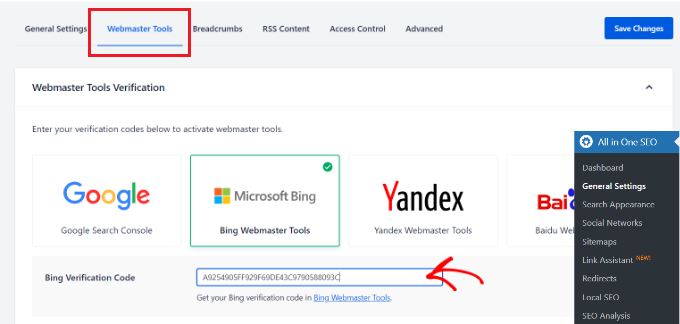
Once the AIOSEO plugin is activated, You need to go to AIOSEO » General Settings from your WordPress dashboard. Then, go to the ‘Webmaster Tools’ tab and click ‘Bing Webmaster Tools.’
The Bing Verification Code must then be entered. Let’s look at how to get to the code in the webmaster tool.
How to Get a Bing Webmaster Tools Verification Code
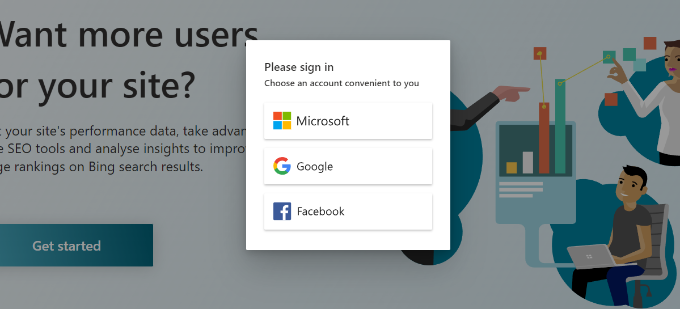
To begin, go to the Bing Webmaster Tools website and select the ‘Get started’ option.
Because you’ll need to return to your WordPress admin dashboard to finish the verification process, we recommend accessing the Bing Webmaster Tools website in a different browser window or tab.
Following that, you must login into your account.
Log in with your Microsoft, Google, or Facebook account. To sign into the webmaster tool, simply click on any of the choices and enter your email address.
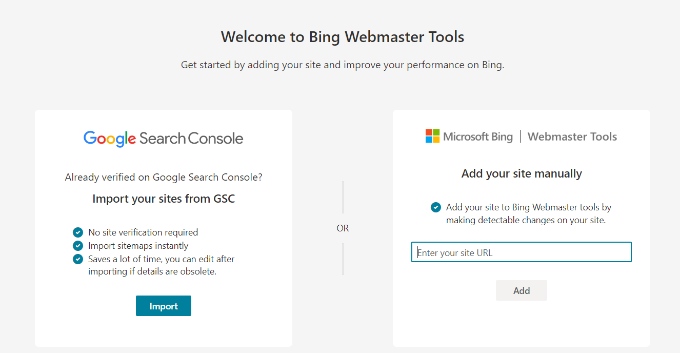
Following that, Bing Webmaster Tools will show you two alternatives for adding your website.
- You may import your sites from Google Search Console or
- add them manually.
We’ll acquire the verification code the manually.
Enter your website address in the ‘Add your site manually’ box, then click the ‘Add’ button.
While adding your WordPress website, be sure to provide the WordPress URL. This is because Bing will treat HTTP and HTTPS as distinct sites. It will also treat your domain’s WWW and non-WWW versions as distinct websites.
To find out which URL WordPress is using, go to Settings » General in your WordPress admin area. Then, in the ‘Site Address (URL)’ area, check for the link.
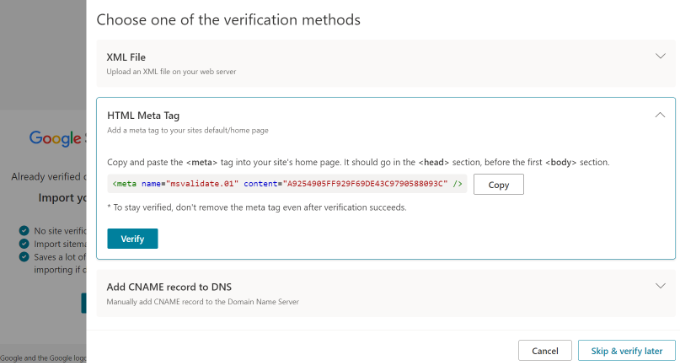
A pane will slide in from the right once you enter this website URL into Bing Webmaster Tools.
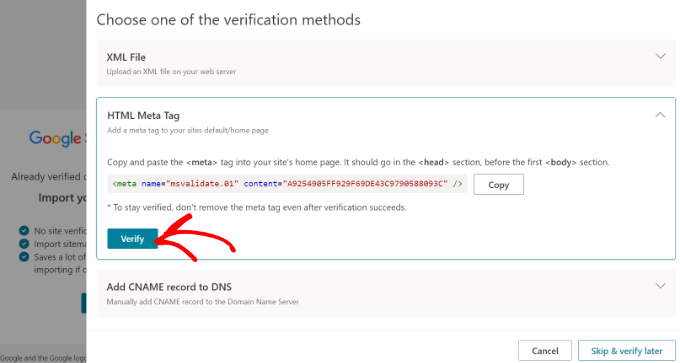
Various techniques for verifying your website are shown here, including an XML file, an HTML meta tag, and adding CNAME record to DNS.
We’ll utilise the HTML Meta Tag approach in this lesson. When you select the ‘HTML Meta Tag’ option, Bing provides you with a validation code that you must install on your website.
Go ahead and copy this line of code by clicking the ‘Copy’ button.
Now, Add This code to your WordPress website.
Verify Your Site in Bing Webmaster Tools by Adding a Verification Code
Return to the WordPress admin browser window or tab immediately.
Then, from your WordPress dashboard, navigate to AIOSEO » General Settings.
Go to the ‘Webmaster Tools’ page now and paste the HTML Meta Tag you copied before into the ‘Bing Verification Code’ section.
Don’t forget to click the ‘Save Change’ button at the top when you’re finished.
Return to the Bing Webmaster Tools tab or window and click the ‘Verify’ button once you’ve added the HTML meta tag to your website.
Following that, you’ll notice a notification in Bing Webmaster Tools indicating that your verification was successful. And window showing the message-
“Congratulations!
Site Addition Successful”
After that, you may close the notification and access your Bing Webmaster Tools dashboard.
We hope this post was useful for you to learn about adding your website to Bing Webmaster Tools.


